

Replacing Siding and Windows Together, the Right Order
Why replacing siding and windows together works best in BC, the right order of work, who owns the flashing, and how exterior insulation changes the plan.
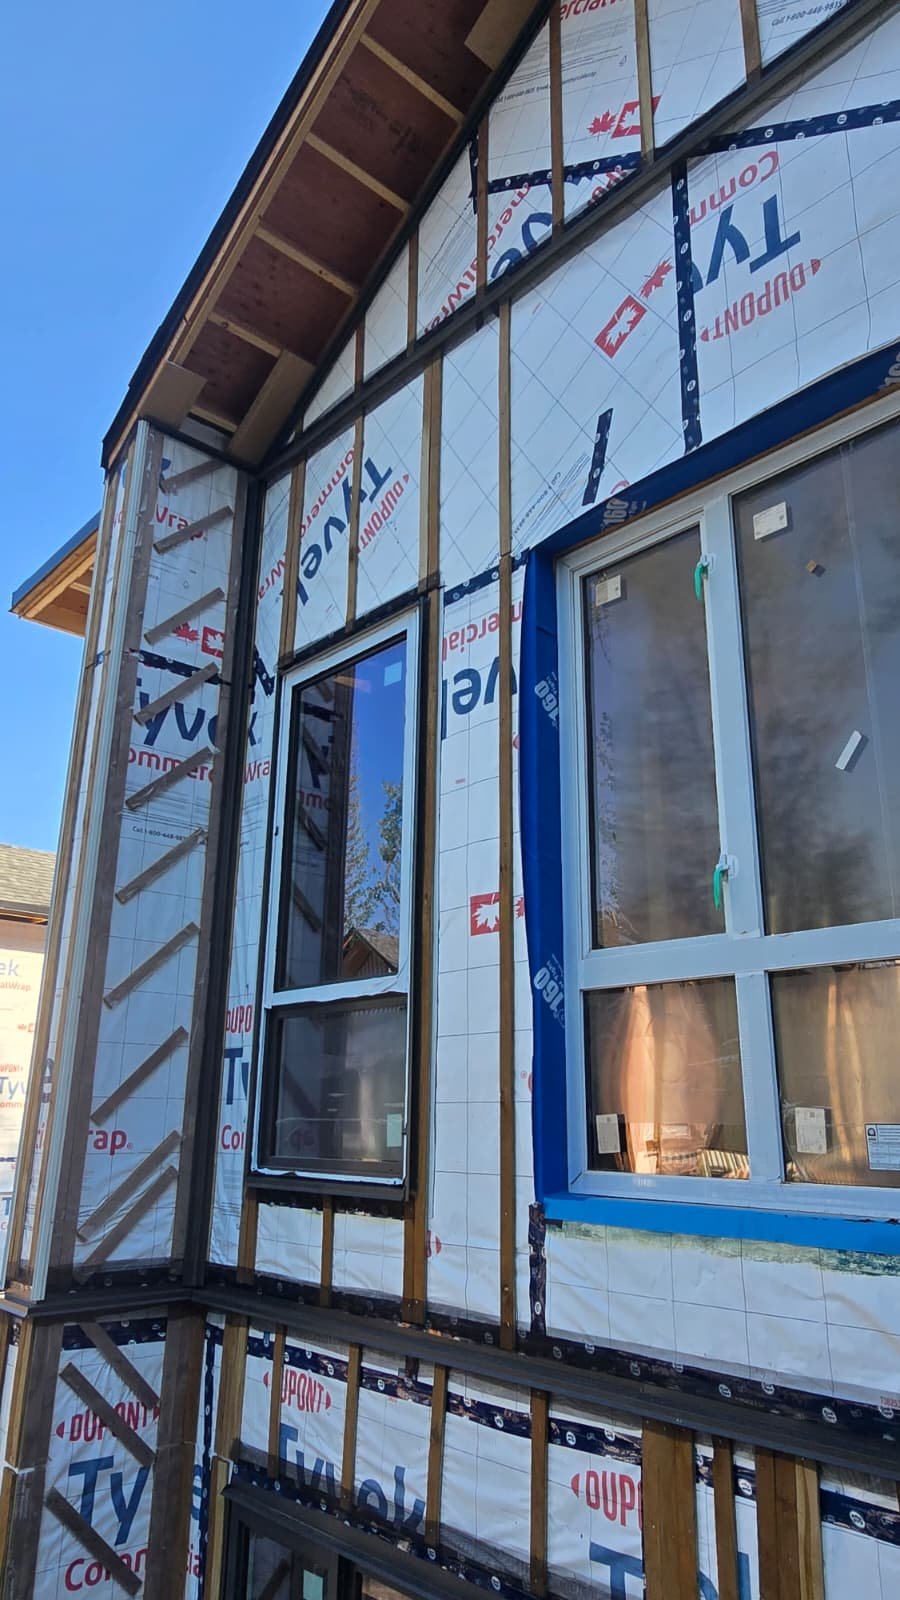
When siding and windows are both due, replace them together and in this order. Strip the old siding, remove the old windows, repair the rough openings and sheathing, install the new weather barrier and sill pans, set and flash the new windows, then install rainscreen strapping, trim and siding. Done in that sequence, every window is tied into the new wall in one continuous system, and you pay for one round of scaffolding, one tear-off and one set of trim instead of two.
Doing the two jobs separately is the most common way we see good windows and good siding meet at a bad joint. Our renovation and construction crews plan both scopes as one project, and this guide explains the sequence, the coordination and the decisions to make before anything comes off the wall.
Why the joint is the problem
A window is only as watertight as the wall it is flashed into. Replace windows alone in a sided wall and the installer has to work around the old cladding and old paper, usually with tape and caulk where a lapped flashing should be. Re-side alone around old windows and the siding crew has to tie new flashing into frames that may already leak at their corners. Either way, one side of the joint is a compromise.
With the cladding off, the whole rough opening is exposed. The sheathing and framing around each window can be checked and repaired, a sill pan with a back dam can go in, and the head flashing can be lapped under the new barrier the right way. The practical savings follow from that. Scaffolding, disposal, site setup and exterior trim are shared, and the disruption inside the house happens once instead of twice.
The sequence, step by step
- Open a test area and measure. Final window sizes are taken from the rough openings, not the old frames, ideally after one opening has been exposed so we know what the framing looks like.
- Decide window position and order. Where the window sits in the new, thicker wall affects frame type and jamb depth, so it is settled before the order goes in.
- Receive and check the windows. Units are inspected on delivery for size, glass damage and correct operation before any wall is opened.
- Set up by elevation. Scaffolding, landscaping protection and a plan that opens one side of the house at a time, with no more openings removed in a day than can be closed by the end of it.
- Strip and remove. Old siding, paper and windows come out. Any opening left overnight is closed with plywood and poly.
- Probe and repair. We probe the sill plate, the studs beside each opening and the bottom of the wall with an awl. Rot under old windows is common, and it is repaired before anything new goes in.
- Barrier and sill pans. New barrier goes on, lapped shingle fashion, and each opening gets a sill pan with a back dam and turned-up ends.
- Set the windows. Each unit is shimmed level, plumb and square, fastened through the flange as the manufacturer specifies, and opened and closed to check operation before any flashing covers it.
- Flash jambs and heads. Jamb membranes lap over the pan, the head flashing goes in with its back leg behind the barrier, and the barrier flap above is folded down and taped. The bottom flange stays unsealed so the pan can drain.
- Air seal from inside. The gap between the window frame and the framing is sealed from the interior with backer rod and sealant or low-expansion foam, so the airtight line is inside and the drainage path outside stays open.
- Strapping, trim and siding. Strapping forms the rainscreen gap, with exterior insulation first if it is part of the plan, then casings, corners and cladding.
Steps 7 to 9 are where most window leaks begin. Our guides to the flashing details that stop leaks and house wrap vs building paper cover those laps in detail.
Who owns the flashing
The most important coordination question is who is responsible for the joint between window and wall. When one company supplies and installs windows and another does the siding, the flashing between them can fall into the gap, with each assuming the other handles it. When that window later leaks, the window maker points at the installation and the siding crew points at the window.
Settle it in writing before work starts. On our combined projects, Mega Siding sequences the window installation into the wall work so the sill pans, flashing and barrier tie-in are part of our scope. If you use a separate window supplier or installer, the written scope should say exactly who installs the sill pans, who flashes the heads, who seals the frame to the barrier and who air seals the interior gap.
Window position and wall depth
New siding over a rainscreen gap makes the wall thicker than old siding nailed straight to the sheathing. Add exterior insulation and it grows again. A window can sit at the sheathing, at the new outer face, or in between.
Windows left at the sheathing behind thick insulation need extension jambs and deep, sloped sills. Windows brought forward need a buck, a plywood or engineered frame fastened to the rough opening, with the flashing carried out to the new plane. There is no single right answer, but there is a right answer for your wall, and our guide to adding exterior insulation on an older home explains how it is chosen.
Casings and trim depth
Thicker walls change the trim too. Casings have to project far enough to look right against the new cladding and to carry the head flashing past the face. Wide casings with a head trim read traditional, narrow casings or metal picture frames read modern. Plan the casing style with the window position, and see our post on James Hardie trim and corner details for how those edges are built.
Insert windows during a re-side
Insert or retrofit windows are designed to fit inside the old frame without disturbing the siding. On a project where the siding is coming off, that saving disappears. Inserts also leave the old frame and its flashing in place, so any existing leak path stays, and the smaller frame reduces the glass area.
With the cladding off, full frame replacement is almost always the better choice. You get a clean rough opening, a proper sill pan and flashing you know is right.
Choosing windows with the new siding in mind
- Frame colour. Window frames are part of the exterior palette, and a black frame against light fibre cement reads very differently from a white one. Choose them together.
- Flanged or block frame. Most new construction windows in BC have a nailing flange that is flashed into the barrier. Confirm the frame type suits the wall detail your contractor plans.
- Opening sizes. A re-side is the time to enlarge or add openings, but new or wider openings need properly sized headers and usually a permit.
- Bedroom and stair windows. Some have code requirements for opening size or safety glass. Your window supplier can confirm what applies.
Permits, rebates and scheduling
Permit rules vary by municipality, and changes to opening sizes or structure usually trigger one. Our siding permits guide covers how to check. Combined window and envelope upgrades are often the kind of work energy rebate programs look at, so read our overview of CleanBC and utility rebates before you sign, since many programs need an assessment before work starts.
Book the siding start after the confirmed window delivery date, with a buffer. Work continues through Lower Mainland rain with good temporary protection, but no wall should sit open waiting for a late window. Our post on the best time of year to re-side covers how season affects the schedule.
What changes inside the house
From inside, a combined project feels much like a window replacement. Each opening is out for a short period while the new unit is set, then the interior gap is air sealed and the drywall returns and casings around the window are repaired or replaced. Confirm in the scope who handles interior trim, drywall and paint around each window, since that work is easy to leave out of both quotes.
If both your siding and windows are getting tired, contact Mega Siding for a free quote on doing them together.