

Adding Exterior Insulation When You Re-Side an Older BC Home
How exterior insulation is added during a re-side on an older BC home, what changes at windows, rooflines and foundations, and when the upgrade makes sense.
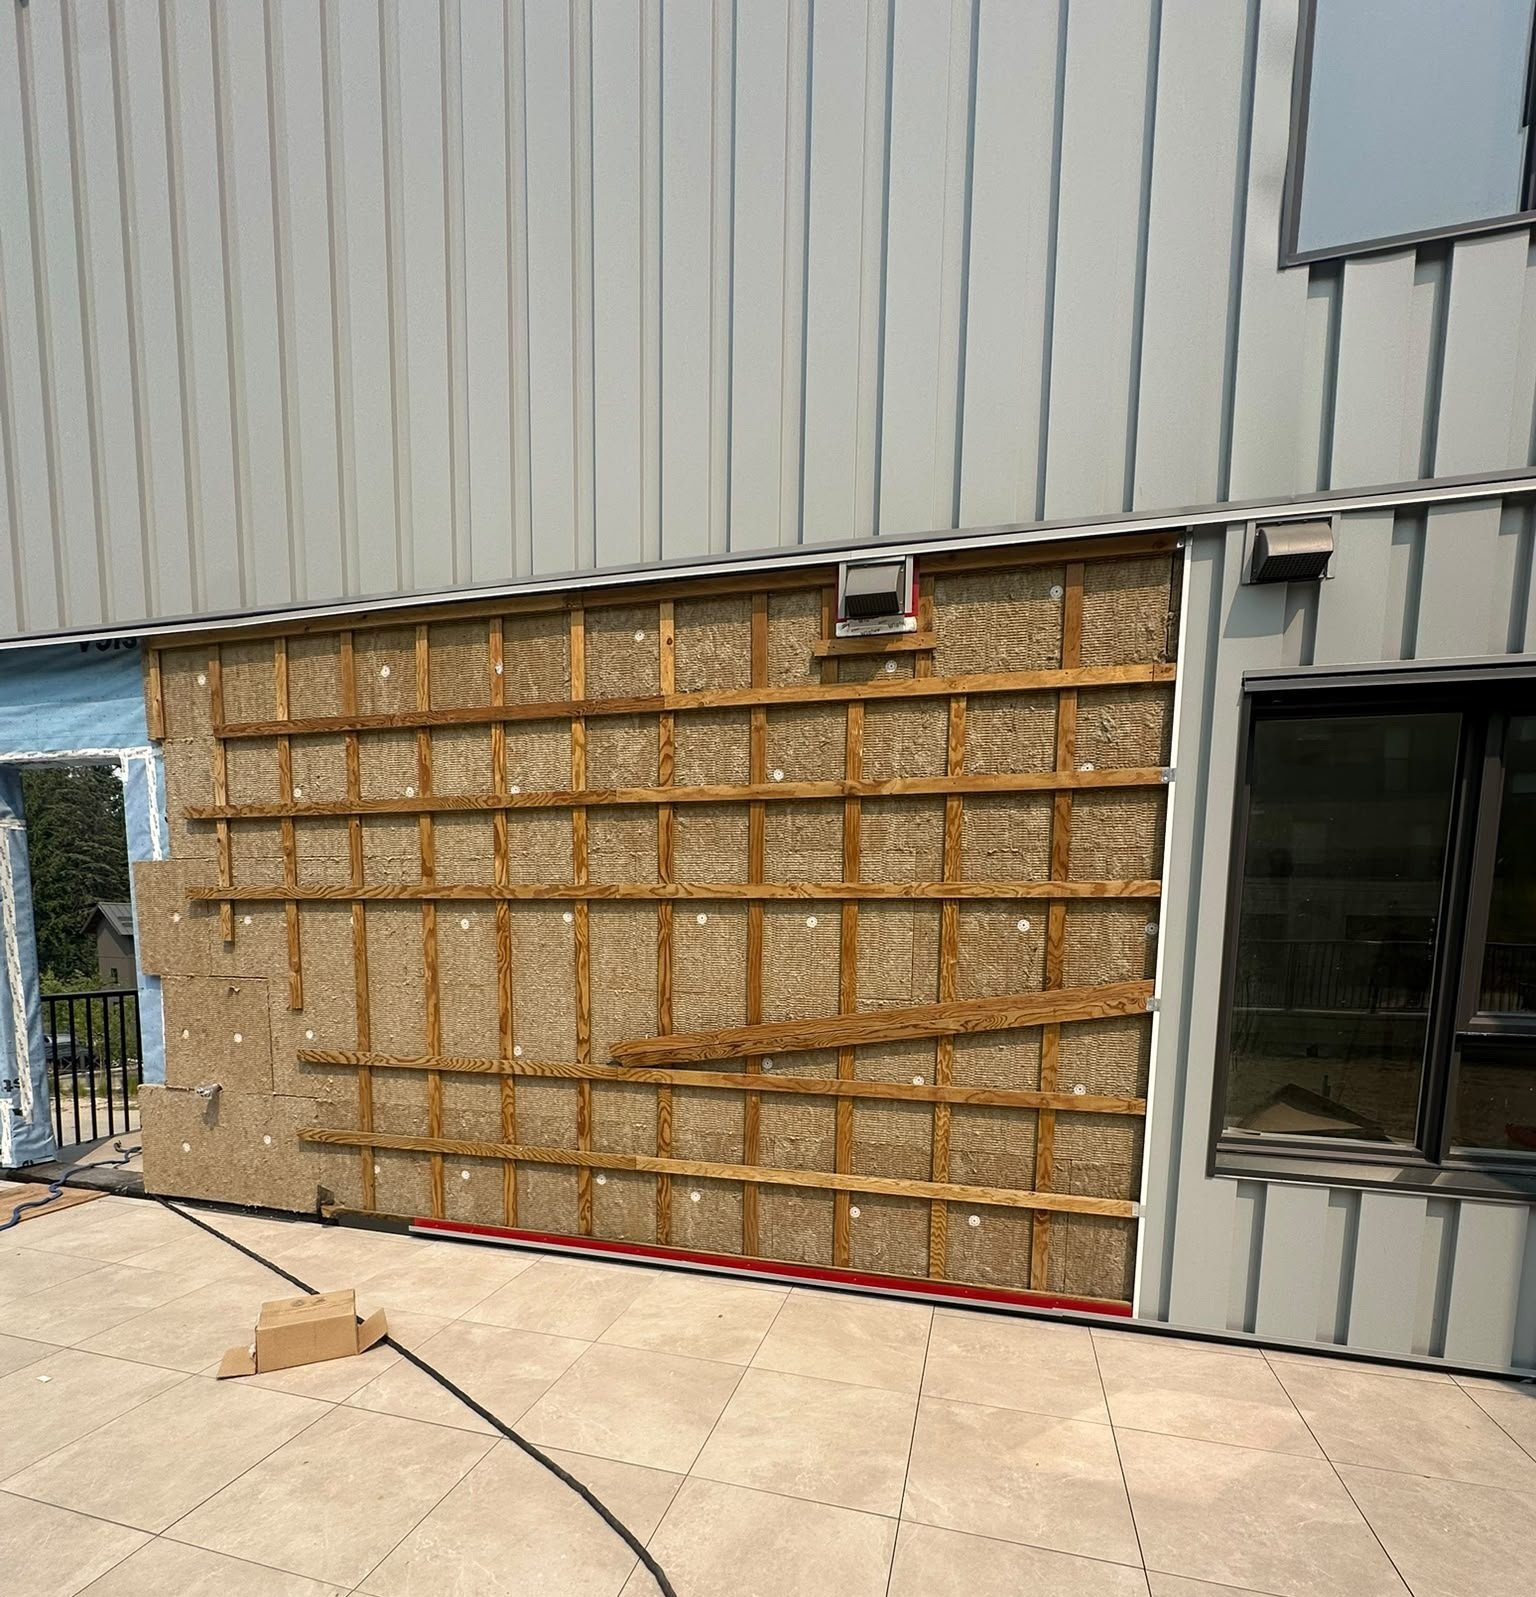
Adding exterior insulation when you re-side an older BC home means installing a continuous layer of insulation boards over the sheathing, then rainscreen strapping screwed back through it into the studs, then the new siding. It is one of the most practical energy upgrades available, because the old cladding is coming off anyway and the wall is open. The catch is depth. The wall gets thicker, and every window, door, roof edge, deck and service connection has to be detailed for the new wall face.
Mega Siding builds these assemblies as part of our exterior insulation work on houses and multi-family buildings across Metro Vancouver and the Fraser Valley. This post covers what we check before recommending it, how the layers go on, and what changes around the house.
For the code side, see our guide to BC Step Code and exterior insulation.
What the outside layer fixes
In a stud wall, the wood framing conducts heat far better than the insulation between it, so a large share of the wall leaks heat through studs, plates and rim joists. Our post on thermal bridging and continuous insulation explains the physics. Wrapping the outside in an unbroken layer covers that framing.
On an older home the second benefit matters as much as the first. The sheathing sits on the warm side of the new insulation, so it stays warmer and drier through the winter and is less likely to collect condensation from indoor air leaking outward.
What we check before recommending it
Not every older wall is a good candidate, and the answer usually comes from a few checks during the estimate.
- What is in the stud cavity. We look behind an outlet cover or a removed board to see the insulation type and whether there is a polyethylene vapour barrier on the inside. That decides which exterior insulation suits the wall.
- The sheathing. Many pre-1970s Lower Mainland houses have board sheathing rather than plywood, with gaps between boards that leak air. A well-taped membrane over it gives a large comfort gain.
- The windows. Their age, condition and how they are attached decide the window strategy, which drives most of the detailing.
- The overhangs. Short eaves lose part of their protection when the wall grows outward.
- Distance to the property line. On narrow lots the added depth can matter for setbacks, so it is worth checking early.
- Meters, decks and attached structures. Each one has to come out to the new wall face or be detailed around it.
The layers, from the sheathing out
1. Strip, probe and repair
The old siding and paper come off. We probe the sheathing with an awl under windows, at corners and along the bottom plate, and any rot is cut out and replaced. Insulating over a wet or soft wall seals the problem in.
2. Membrane and air sealing
A new weather barrier goes on the sheathing, usually detailed as the main air barrier as well, with taped seams and sealed penetrations. The rim joist and the top of the wall are where older houses leak most air, so those get extra attention. Air sealing is much easier from the outside than from inside a finished house.
3. Mark the studs
Before any insulation goes up, we snap a line on the membrane at every stud. Once the boards cover the wall, those marks are the only reliable way to land the long screws in framing rather than in sheathing alone.
4. Insulation boards
Boards go on in a continuous layer with tight, staggered joints, and are cut neatly around every opening. The thickness is chosen from the energy goal, the existing wall and how much depth the windows and trim can take. Our post on mineral wool vs rigid foam compares the two main products.
5. Strapping and long screws
Vertical strapping goes over the insulation and is screwed back through it into the studs. The strapping holds the boards, forms the drained rainscreen gap and gives the siding a nailing base. Screw length, type and spacing are set by the insulation thickness and the weight of the cladding, from the insulation or fastener maker's published tables or from an engineer. Heavier claddings and thicker insulation need closer attention here, because the siding now hangs on screws that span a soft layer.
6. Base of wall
At the bottom, the insulation now projects past the face of the foundation. A bent metal starter flashing supports the bottom edge, covers it, laps out over the concrete with a drip, and carries a perforated closure so the rainscreen drains and rodents stay out. The siding still keeps its clearance above grade, decks and paving.
7. Cladding and trim
Fibre cement, metal, vinyl and wood can all go over exterior insulation when the strapping and fasteners are designed for their weight. Trim layout needs more planning than on a standard wall, and our post on James Hardie trim and corner details covers those edges.
Windows, the main design decision
The new siding face sits further out, so existing windows end up recessed. There are three ways to handle it.
- Leave the windows where they are and line the deeper opening with extension jambs, a sloped sill and wider casing. This works when the windows are fairly new.
- Bring the windows out on a buck, a plywood or engineered frame fastened to the rough opening and projecting into the insulation layer, so the window sits closer to the new wall face.
- Replace the windows during the re-side and set the new units in the position that suits the wall.
Each option needs its own flashing plan, because the membrane at the window has to connect to the membrane on the sheathing without leaving a step that holds water. If the windows are near the end of their life, replacing them during the re-side usually gives the cleanest and driest result.
Roofline, soffits and gable ends
At the top of the wall, the thicker assembly has to meet the soffit cleanly without blocking attic vents. On houses with short overhangs, the extra depth eats into an already narrow eave, so less of the wall is sheltered. Rake trim at gable ends may need to be extended or rebuilt so it still covers the new wall edge. Our fascia replacement guide covers the roof edge if it is due at the same time.
Decks, meters and penetrations
Deck ledgers should bear on the structure, not hang from screws through the insulation, so ledgers are usually detailed with blocking or engineered connections and flashed through the new layer. Electrical meter bases and gas meters are moved or extended by licensed trades, which may need a utility appointment, so we sequence those early.
Dryer vents, bath fans, hose bibs and lights all need longer sleeves and deeper mounting blocks, each flashed into the membrane. These small items take more time than homeowners expect, and they are where a rushed job leaks.
Mineral wool or foam on an older wall
The insulation has to suit the wall behind it. Many older houses have polyethylene on the inside, and some have none. Mineral wool is vapour-open, so it lets the sheathing dry outward, which suits most existing wood-frame houses and is non-combustible. Foam boards range from fairly vapour-open to almost vapour-closed. Adding a low-permeance foam outside a wall that already has poly inside can trap moisture between the two layers unless the foam is thick enough to keep the sheathing warm.
This is a design question, not a preference. Our post on how walls dry explains the drying side, and on larger or more complex buildings an envelope consultant should confirm the assembly.
When it makes sense, and when it does not
It is a strong fit when the siding is coming off anyway, rooms near exterior walls feel cold or drafty, the windows are due or set up to move outward, and you plan to stay long enough to benefit. It is a weaker fit when the existing siding is sound, the windows are new and set tight to the old wall face, or the budget only covers a like-for-like re-side. On heritage and character homes, the added depth also changes trim proportions, which our heritage siding guide discusses.
Permits, rebates and the quote
Permit requirements vary by municipality, and changing the wall assembly often triggers one. Our siding permits guide covers how to check. Energy rebate programs change over time and many need an energy assessment before work starts, so see our post on CleanBC and utility rebates early.
When you ask for a quote, ask for the insulation priced as its own scope beside the like-for-like re-side, with the window strategy, starter flashing, extended penetrations and fastener schedule spelled out. That makes it easy to compare contractors and to see what the upgrade actually adds.
If you are planning a re-side and want to price the insulation option alongside it, reach out through our contact page for a free quote.
- CleanBC and Utility Rebates for Exterior Envelope Upgrades: How the Process Works
- High-Performance Wall Assemblies in BC: From Code Minimum to Near Passive House
- Thermal Bridging and Continuous Insulation, Explained in Plain English
- Mineral Wool vs Rigid Foam for Exterior Insulation: An Installer's Comparison