

The Flashing Details That Stop Siding Leaks
The flashing details that stop siding leaks in BC walls, from window heads and sill pans to kick-out flashing, base of wall, floor lines and deck ledgers.
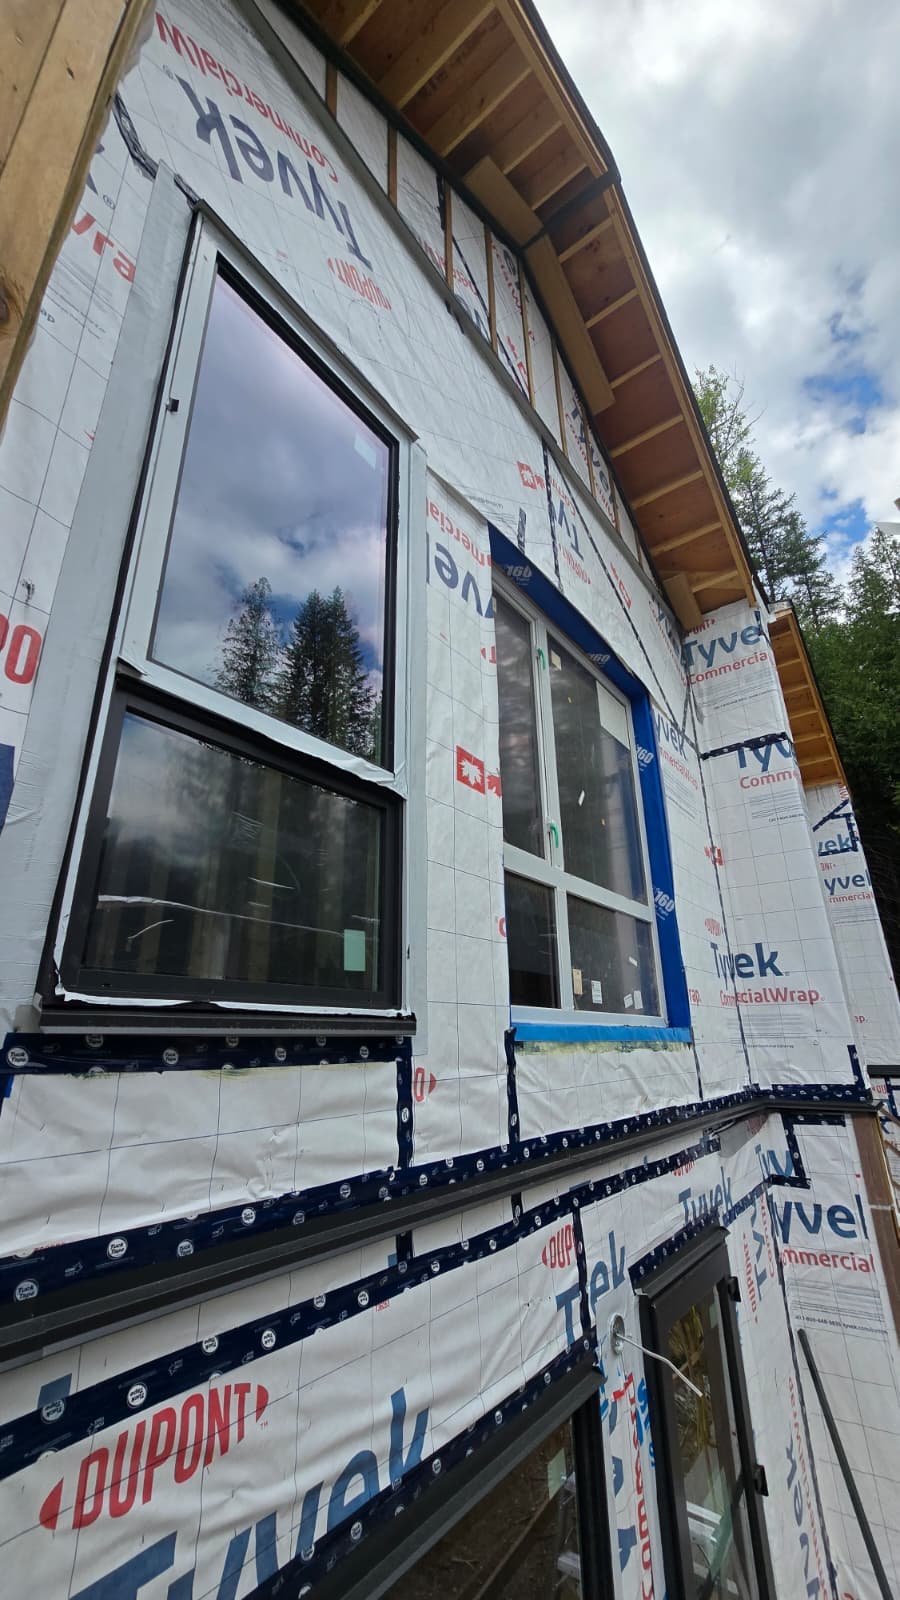
Siding leaks are stopped by flashing, not by caulking. The details that matter most are the head flashing and sill pan at every window and door, a kick-out wherever a roof edge ends against a wall, a base-of-wall flashing under the rainscreen, horizontal flashings at floor lines and material changes, and a proper ledger flashing at decks. Each one works the same way, lapped like shingles and sloped outward so gravity carries water out of the wall.
We open a lot of walls on repair calls across the Lower Mainland, and when we find rot the cause is usually a flashing that is missing, reversed or cut short, not the siding. Getting every one of these right is the core of our siding installation work, and this guide walks through each detail and how it should look when it is done.
Three rules behind every flashing
Lap upper over lower. The layer above always overlaps the layer below, so water running down the wall is always moving outward. The weather barrier laps over the back leg of every flashing, never behind it. Our post on house wrap vs building paper shows the full lapping sequence for the barrier.
Slope out and drip clear. Every horizontal flashing tilts away from the wall and ends in a bent drip that projects past the face of the cladding below, so water lets go instead of clinging and running back.
Leave a way out. Water inside a rainscreen gap runs down the barrier and needs an exit at every flashing. The cladding above a flashing stops short of it, and that gap is never caulked shut. Our rainscreen explainer covers the cavity.
Sealant has a role at some joints, but it is a backup. Flashing is the primary defence because it keeps working after sealant ages.
Materials and workmanship
Most siding flashings are prefinished aluminum or prefinished galvanized steel, bent on a brake to fit each detail. Self-adhered membrane goes under or behind the metal at sills, corners and ledgers. Good metal flashing has a few signs of care.
- The drip edge is hemmed, folded back on itself, which stiffens it and removes the sharp edge
- Lengths are lapped and sealed where they meet, not butted end to end
- Fasteners go only through the upright back leg, high up, never through the horizontal surface water runs across
- Aluminum is kept off pressure-treated wood and copper, which corrode it
Our post on metal cladding colours and finishes covers the dissimilar metal problem in more detail.
Window and door heads
The top of every opening collects water running down the wall above. A correct head flashing has these features.
- It sits on top of the head trim and slopes outward
- It extends past the trim on both sides, with end dams turned up at each end
- Its back leg runs up the sheathing behind the weather barrier, spanning the rainscreen gap
- The siding above stops a small gap above it, with the gap left open
Missing end dams are a frequent fault. Water runs to the end of a flat head flashing and drops into the corner of the rough opening, and it shows up as staining at the top corners of the window inside. Our post on James Hardie trim and corner details shows how the trim finishes around it.
Sill pans under windows and doors
Windows leak. Even good units can let water through their frame corners as they age. A sill pan is the tray under the window that catches that water and sends it back outside.
A proper pan has a back dam at the inside edge, turned-up ends at the sides and a slope or drainage path to the exterior. It is made from a preformed pan or from self-adhered membrane folded up the jambs, and it goes into the rough opening before the window. The bottom flange of the window is left unsealed so the pan can drain.
Door sills need the same detail, and doors onto decks need it most, because the threshold sits close to a wet horizontal surface. Windows set on bare sheathing or a flat strip of membrane with no back dam are the source of most rotted sill plates we find under older openings.
Kick-out flashing at roof-to-wall intersections
Where a lower roof meets a wall, step flashing runs up the slope, one piece woven under each course of shingles, with the barrier and siding lapped over its upright leg. At the bottom end of that roof edge, all the water collected by the step flashing has to go somewhere. Without a kick-out, it runs off the last step flashing and down behind the siding.
A kick-out is a small diverter, ideally a one-piece preformed part with no seams to leak, that turns this water out into the gutter. The gutter should run right to the wall so the kick-out has somewhere to send it, and the siding above the roof keeps the clearance the manufacturer publishes. Its absence is one of the most reliable rot causes on houses with garages, porches or dormers tied into a taller wall.
Base-of-wall flashing
At the bottom of a rainscreen wall, water in the cavity needs an exit. A base-of-wall flashing carries the barrier out over the foundation and ends in a drip clear of the concrete. The bottom of the cavity is closed with a perforated metal or screened strip so air and water move but insects and rodents do not.
Clearance matters as much as the flashing. Siding and trim that sit in soil, mulch or on a deck surface wick water upward and never dry.
Floor lines and material changes
On taller wood-frame walls, a horizontal flashing at each floor line lets the framing shrink as it dries without buckling the cladding. Anywhere one cladding changes to another, such as lap siding over panel or siding over stucco, also needs a Z flashing.
At each one, the barrier above laps over the flashing, the flashing slopes out and the cladding below it stops with an open drainage gap. This detail is often missing on houses that had a partial re-side, where a new material was butted into the old one with a bead of caulk.
Saddle flashings
Where a horizontal surface meets a wall, such as the top of a guard wall, a beam end or the cap of a low wall running into the house, the corner where they meet is a hidden leak path. A saddle flashing is a formed piece that covers that corner, turns up the wall behind the barrier and laps over the cap flashing below. These were a major failure point during the leaky condo era, and they still cause problems on houses with stuccoed or sided guard walls.
Deck and balcony ledgers
A deck ledger bolted to the house holds water against the wall and is pierced by every bolt, which makes it one of the highest risk details on a home. A proper ledger detail has self-adhered membrane on the sheathing behind it, a Z flashing over the top of the ledger lapped under the barrier above, and often spacers so the ledger stands off the wall and can drain. On a membrane deck, the deck membrane turns up the wall behind the siding and the siding stops above the deck surface.
Penetrations through the wall
Dryer vents, exhaust fans, hose bibs, lights, electrical boxes and pipes all puncture the cladding. Each needs a flashed mounting block, with a small head flashing on top lapped under the barrier above, or a purpose-made boot for round pipes. A vent cover screwed onto the siding with caulk around it will let water in behind it sooner or later.
Where to look on your own house
A walk-around after a heavy rain tells you a lot.
- Staining or peeling paint below window corners
- Soft or swollen trim at the bottom of a wall under a roof edge
- Siding that touches soil, decking or a lower roof
- Window trim with no flashing visible above it
- Interior staining at window corners or on ceilings below a deck
None of these prove a leak, but each tells you where to look first. Our guide on how rain gets behind siding explains the paths water takes and how to trace them.
Repairing a missing or failed flashing
Fixing a flashing means opening the wall far enough to install it properly. That usually means removing siding around the area, cutting out damaged sheathing or framing, installing new membrane and flashing lapped under the barrier above, and closing the wall with matching cladding. A flashing slipped in from below, with nothing lapping over it, only moves the leak.
Ask any contractor how high the opening will go and how the new flashing will tie into the existing barrier. Most single flashing problems are a contained siding repair. Where many details are wrong across a house, a full re-side lets every flashing be done right at once.
If you have staining, soft trim or a leak you cannot trace, contact Mega Siding for a free quote and an inspection of the details around it.